Drawing
Draw a Path with the Pen Tool
The Pen tool ![]() lets you draw both straight and curved lines. To draw a path, you should add one segment after another. If any of the added anchor points or segments require adjustments, you can edit the path after it is created.
lets you draw both straight and curved lines. To draw a path, you should add one segment after another. If any of the added anchor points or segments require adjustments, you can edit the path after it is created.
The Disable touch drawing option can make your work with drawing tools more convenient if you are using Apple Pencil.
Controls of the Pen Tool
The Pen tool displays several options in the Control panel. They let you choose different modes of the tool. The use of those modes is discussed further in this section and also in Edit a Path.
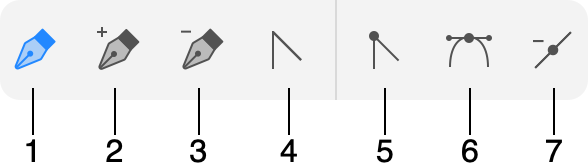
1 - Pen tool to draw a path. In this mode, you add anchor points to create a new path.
2 - Add an anchor point to an existing path. Tap on the path with this tool.
3 - Delete an anchor point. Tap on the anchor point with the tool.
4 - Change the type of an anchor point from smooth to corner, and vice versa. In this mode, you can:
- Tap on a corner anchor point to select it.
- Tap on a corner anchor point and drag to convert it into a smooth point.
- Click on a smooth point to convert it into a corner point.
- Drag a direction point to adjust the curvature of one segment keeping another segment unchanged.
- Drag a direction point holding two more fingers on the screen to adjust the curvature of both segments that are connected to the anchor point.
5 - Convert a selected anchor point to the corner point type.
6 - Convert a selected anchor point to the smooth point type.
7 - Delete an anchor point. You should select the anchor point with the Pen tool and then tap on this button.
You can change the anchor point type from smooth to corner or vice versa by double-tapping on that point with the Pen tool. To remove a direction line (actually make its length equal to zero), tap on its direction point with the Pen holding two fingers on the screen.
The ![]() button temporarily appears in the Control panel while you are drawing a path. It lets you finish drawing the current path without deactivating the Pen tool. The tool will finish drawing automatically if you close the path.
button temporarily appears in the Control panel while you are drawing a path. It lets you finish drawing the current path without deactivating the Pen tool. The tool will finish drawing automatically if you close the path.
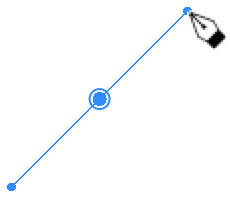
Draw a Straight Line
- Activate the Pen tool.
- Tap at the point where the line should start.
- Tap at the point where the line should end.
- To stop drawing, tap on
 in the Control panel. Or, activate any other tool (for example, Move).
Draw a Polygon
- Activate the Pen tool.
- Tap at the point where one of the polygon's corners should be located.
- Tap several times at points where other corners should appear.
- Tap on the first point to close the outline of the polygon.
Draw Curved Path
- Activate the Pen tool.
- Touch the screen and hold at the point where the path should start.
- Move your finger aside to see the direction line. Set the length and angle of the direction line. Both of them will affect the curvature of the path you draw. Detach your finger.
- Touch and hold at the next point.
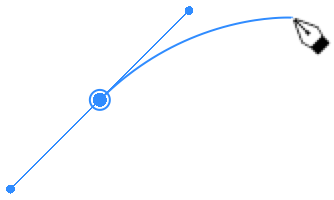
- Repeat the two preceding steps.
- Tap on the first point if you want to close the shape.
or
Tap on in the Control panel to stop adding more segments to the path.
Notice that you can combine curved and straight segments.
As an alternative technique of drawing a curved path, you can create it out of straight segments. Then make them curved as explained on the Edit a Path section.
While you are drawing a path, you can switch the type of a segment, that you are about to add, from curved to straight. To do this, tap on the point that is currently the last point of the path.
In the middle of the path drawing process, you can add and remove anchor points. To do that, switch the Pen tool to the appropriate mode. Then you can continue drawing in the main mode.
Continue Drawing an Existing Path
After you have finished drawing a path, it is possible to add more segments at one of its ends. To do this, select the path and then activate the Pen tool. The anchor point that was added the last may have an additional circle around indicating that a new segment will begin at this point.

If no point was selected by default, or you want to choose the opposite end of the path, select the respective point with the Selection tool. Then activate the Pen tool to draw a segment.
Rotating Direction Lines
The Pen tool in its default mode lets you rotate direction lines by dragging the corresponding direction points. If the angle between the two adjoining direction lines is 180 degrees, they will rotate together preserving this angle.
To change the angle from 180 degrees to any other, rotate a direction line holding one finger on the screen. The second direction line will preserve its position. If you perform this operation with an arbitrary angle, the direction lines will snap to 180 degrees and rotate together again.
By holding two fingers on the screen, you rotate the direction lines together preserving 180 degree angle between them no matter what the original angle was.
Stroke Width and Color
To change the stroke width and color, use the Appearance panel.
Modifier Keys and Shortcut Summary
With an external keyboard, you can use the following shortcut and modifier keys.
Shortcut:
- P activates the Pen tool.
Pen tool modifier keys:
- Space switches to the Pan mode.
- Command switches to the Selection tool.
- Option activates the Convert Anchor Point tool.
- Shift-tapping lets you select multiple anchor points.
- To remove a direction line (make a corner), tap on the respective direction point holding down the Option or Shift key.
- [ decrements the stroke width.
- ] increments the stroke width.