Changing Object's Shape
Using a Clipping Mask
About Clipping Masks
A clipping mask is an object whose outline masks another object. You can treat such a mask as an infinite surface with a hole defined by the clipping path through which you can see a masked object.
You might be familiar with the crop tool that is present in any photo editing software. A rectangular clipping mask can do the same, but it is much more flexible. It can have any other shape and can also be applied to multiple separate objects. In addition to that, you can still edit the mask and masked objects after the mask has been applied.


Use Clipping Mask to Hide Parts of Objects
To apply a clipping mask to an object:
- Create a vector object that will be used as a clipping mask. Only the shape of its path matters.
- Place the clipping path over the object you want to mask.
- Select both the mask and object.
- Choose Modify > Make Clipping Mask command from the main menu.
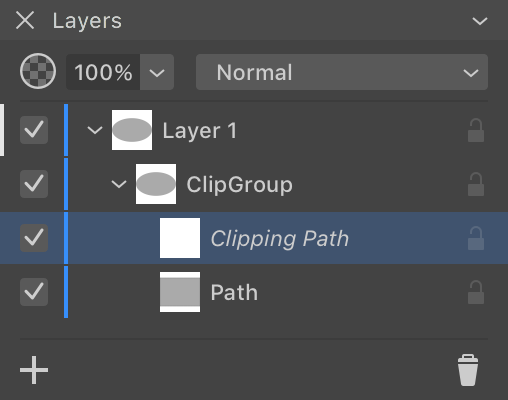
The result is a Clipping Group object that includes the clipping path and masked object.
Only a vector object can be used as a clipping path. If you try to create a clipping mask out of a raster image, the rectangular boundary of this image will be used to create a clipping path.
You can mask any artwork.
A clipping mask created as explained above has no fill or stroke. It doesn't retain any style that the original object could have. If you want the mask to retain its original style, use the method explained below.
With help of the Layers panel, you can create a Clipping Group preserving the styles of the object(s) and mask. To do this, open the Layers panel and make sure that the object and its future mask are visible. Drag the object in the panel and drop it onto the object that should become the mask. The app will create a Clipping Group with both objects inside it. If the group should contain more objects, drag them into the group as well.
Edit a Clipping Mask
You can modify the clipping path using vector editing tools.
In order to outline the visible part of the masked object, apply a stroke to the clipping path.
Edit a Masked Object
In order to edit a masked object, select it in the Layers panel. The object can be found inside the corresponding Clipping Group. Then you can modify the masked object using regular methods and tools.
Release Objects from a Clipping Mask
To release objects from a clipping mask, select the respective Clipping Group in the Layers panel or on the canvas. Then choose Modify > Release Clipping Mask from the main menu.
Notice that the clipping mask will turn into an invisible object if it has no stroke nor fill.
You can also release the clipping mask directly in the Layers panel. Expand the Clipping Group item in the panel to see its contents. Then drag the object and drop it outside the group. If the clipping group contains multiple objects, drag them one after another. Or select all of them and drag them together. Once there are no objects in the group, it will disappear.