Layout
Sheets
Documents can have one or multiple sheets. You can specify the initial size of sheets when you are creating a new document.
Activate a Sheet
To activate (or select) a sheet, tap on its name in the Sheets panel. If you are going to work with multiple sheets, then it makes sense to name sheets appropriately in order to distinguish them in the list.
Another way to activate a sheet is to tap on it with the Sheets tool ![]() .
.
Objects and Sheets
Each sheet has its own coordinate system. The object coordinates are calculated in relation to the active sheet.
Each object is associated with some sheet. There is no strong linking between sheets and objects. Once an object is added on top of a sheet, the object becomes associated with this sheet. Then, any time you select that object, the respective sheet becomes activated.
Later, it will be explained how to rearrange sheets on the canvas. When you change the location of a sheet, objects can either move along with it or remain at the same position. In the former case, all objects that are placed over the sheet completely or partially will move no matter which sheet they belong to. After that, all objects that were relocated together with the sheet will belong to this sheet.
If you choose to move objects together with a sheet, make sure that all of your artwork either moves or stays. Otherwise, you can break the design apart.
The Move artwork with the sheet button ![]() controls the ability to move objects when you relocate a sheet. It is available in the Control panel when the Sheets tool is activated. The same button is present in the Sheets panel.
controls the ability to move objects when you relocate a sheet. It is available in the Control panel when the Sheets tool is activated. The same button is present in the Sheets panel.
Manage Sheets using the Sheets Panel
To open the Sheets panel, open the Document panel. Then tap on the Sheets button.
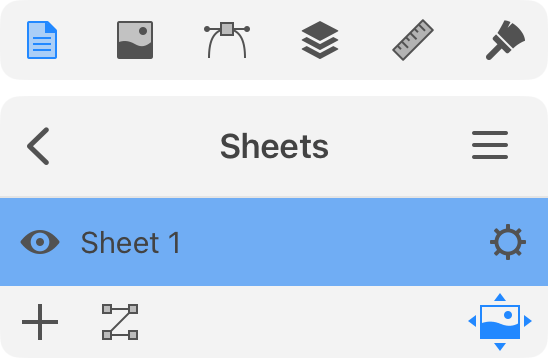
The Sheets panel lists sheets present in the current document. If there are multiple sheets in the document, give them meaningful names to easily differentiate one sheet from another. In order to rename a sheet, double-tap on its name in the list.
The panel lets you add and delete sheets. See the Add and Delete Sheets subsection for more details.
A sheet can be made invisible by tapping on an eye icon near the sheet's name.
To define how sheets should be arranged on the canvas, tap on the ![]() button. The Move and Arrange Sheets section has more details on this topic.
button. The Move and Arrange Sheets section has more details on this topic.
Sheet Properties
Properties of each sheet can be accessed by tapping on the corresponding ![]() icon. The Sheet Properties panel lets you set up the size, orientation, and position of the sheet.
icon. The Sheet Properties panel lets you set up the size, orientation, and position of the sheet.
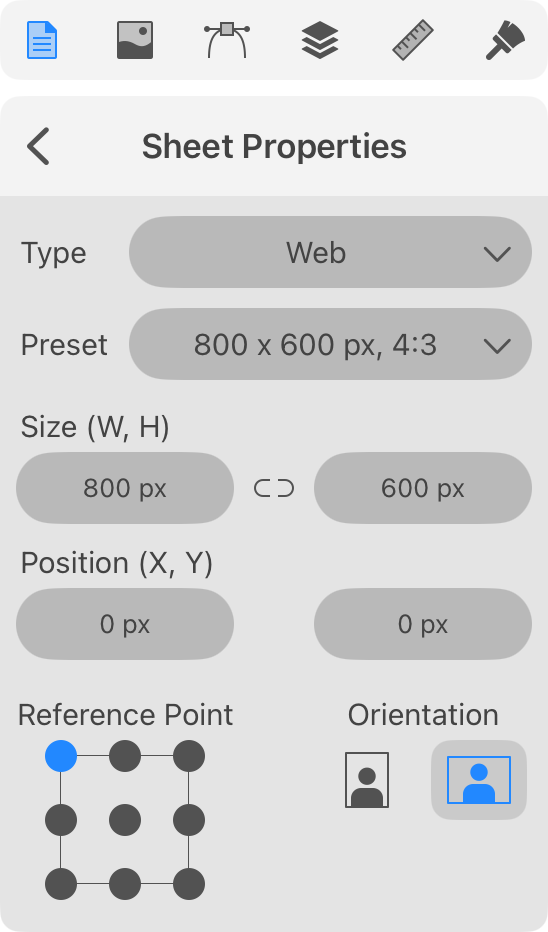
You can choose a pre-defined sheet size by selecting a combination of Type and Preset. You can also input the width and height directly into the Size fields.
Each sheet can be positioned on the canvas by inputting the X and Y coordinates. Notice that these fields always operate with the global coordinates.
You can also change the origin point using the 9-point Anchor control. It defines which of the nine points should appear at the coordinate set by X and Y. For example, if you want to place the center of the sheet at the zero coordinate, tap on the point in the center of the Anchor control.
The Orientation buttons simply swap the current width and height.
Add and Delete Sheets
In order to add a new sheet, tap on the plus button at the bottom of the Sheets panel.
By default, a new sheet has the same size as one that was previously selected in the list. That is, if your document already has big and small sheets, and you want to have one more small sheet, select the small one before tapping on the plus.
To duplicate a sheet, activate the Sheets tool ![]() . Place two of your fingers on the canvas. Swipe over the sheet to have its copy created. Then drag a new sheet to an empty place. If you want to duplicate the sheet together with objects, activate the Move artwork with the sheet option
. Place two of your fingers on the canvas. Swipe over the sheet to have its copy created. Then drag a new sheet to an empty place. If you want to duplicate the sheet together with objects, activate the Move artwork with the sheet option ![]() in the Control panel.
in the Control panel.
To delete a sheet, swipe along its name to the left, and then tap on the trash bin icon. You cannot delete the last sheet.
You can also access the New, Duplicate and Delete commands by tapping on the menu button ![]() in the Sheets panel.
in the Sheets panel.
There is an alternative way to add and delete sheets. This can be done using the Sheets tool that is described below.
Move and Arrange Sheets
You can select how sheets should be arranged on the canvas by tapping on ![]() in the Sheets panel. This button opens another panel.
in the Sheets panel. This button opens another panel.
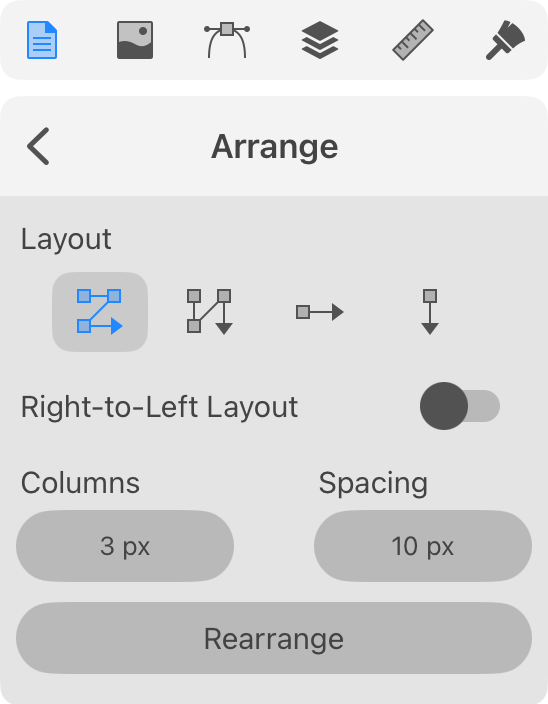
The Layout options define how sheets should be arranged on the canvas.
The Right-to-Left Layout option inverses the order of sheets when you add them.
The leftmost button in the Layout settings places sheets in a fixed number of columns and variable number or rows. The Columns parameter defines how many columns there should be. Identically, you can set up the number of rows when the second Layout button is selected.
The Spacing field defines the distance between sheets vertically and horizontally.
To apply a new setting, simply tap the Rearrange button.
Jump to a Sheet
In a document with multiple sheets, one or several of them may appear beyond the visible area. You can use scrolling in order to access such a sheet. The Sheets panel lets you jump to a sheet by tapping on the sheet's name. This function scrolls to the sheet and fits it into the editing area.
Setting Up the Sheet Color and Transparency
By default, all sheets have white background. You can switch from the white background to the transparency grid using the Transparent Background option in the Document panel. This helps you see which parts of your design are white and which are transparent.
Each sheet in the Sheets panel has a Color button that allows you to change the background color. Note that this color will not be exported or printed.
Sheets Tool
The Sheets tool ![]() lets you add, delete and relocate sheets. To activate this tool, tap on its icon in the Tools Panel.
lets you add, delete and relocate sheets. To activate this tool, tap on its icon in the Tools Panel.
Once the tool is activated, the Control panel displays the related settings. Later, we'll discuss the purpose of each of them.

Select a Sheet
In order to delete, move or resize a sheet, you should select it.
To select a sheet, tap on it with the Sheets tool. You can also tap on the sheet name in the Sheets panel. A selected sheet displays a frame with handles.
Resize a Sheet
To resize a sheet, tap on it with the Sheets tool. Then drag a side or corner handle.
To input the exact width and height in pixels or other units, use the Sheet Properties panel.
Add a Sheet
There are two ways of adding new sheets using the tool in addition to the method given in the Add and Delete Sheets section.
To add a new sheet with the same dimensions as the selected one, tap on the plus icon in the Control panel.
You can apply a Preset and change the Orientation of a sheet any time later using the Sheet Properties panel.
Another way to add a new sheet is to draw it. Activate the Sheets tool. Touch and drag over the free space on the canvas. Detach your finger when the sheet has a proper size.
Delete a Sheet
To delete a sheet, tap on it with the Sheets tool. Then tap on the trash icon ![]() near the left side of the screen.
near the left side of the screen.
Relocate a Sheet
To relocate a sheet, drag it with the Sheets tool.
A more accurate way is to input new coordinates into the X and Y fields in the Sheet Properties panel.
The Move artwork with the sheet option ![]() in the Controls panel lets you move objects located on the sheet together with the sheet. Normally, this option should be activated.
in the Controls panel lets you move objects located on the sheet together with the sheet. Normally, this option should be activated.
The Coordinate System
There are two independent coordinate systems linked with sheets. The global coordinates are only used to define the location of sheets on the canvas. Two sheets that have the same Position and Anchor point overlap at least partially.
Each sheet provides its local coordinate system for objects on it. The coordinates of an object are defined in relation to the sheet corner which serves as the zero point. Another object on a second sheet may have the same values for X and Y. But, these objects will have different locations on the canvas because they exist in different coordinate systems defined by the respective sheets.
When the Sheets tool is activated, the app switches the global coordinates.
Modifier Keys and Shortcut Summary
With an external keyboard, you can use the following shortcut and modifier keys.
Shortcut:
- S activates the Sheets tool.
Sheets tool modifier keys:
- Space switches to the Pan mode.
- Command switches to either Move or Selection tool depending on which of them was active most recently.
- Option lets you duplicate a sheet. Drag a sheet to create its duplicate.