Shape Builder Tool Comparison in Top Vector Apps
The Shape Builder tool is a favorite feature of design apps for vector creators and artists. This tool allows users to fluidly edit shapes and build complex shapes out of simple ones, in a fraction of the time it would take to draw them while trying to manipulate anchor points. Artists are able to have a quicker workflow and unlimited options, thanks to the Shape Builder tool. In this article, we’ll take a look at this tool in four different graphics applications, and explain how to use them and what advantages each one has.

Amadine’s Fusion Tool—a New Shape Builder
First on our list is the Amadine’s Fusion tool analogous to Shape Builder in scope of functionality. The Fusion tool lets you combine or fuse shapes, as the name indicates. The tool also allows you to delete custom sections of objects in order to make new forms. The Fusion tool gives endless creative options to make new vector shapes quickly and easily due to its useful and clear settings.
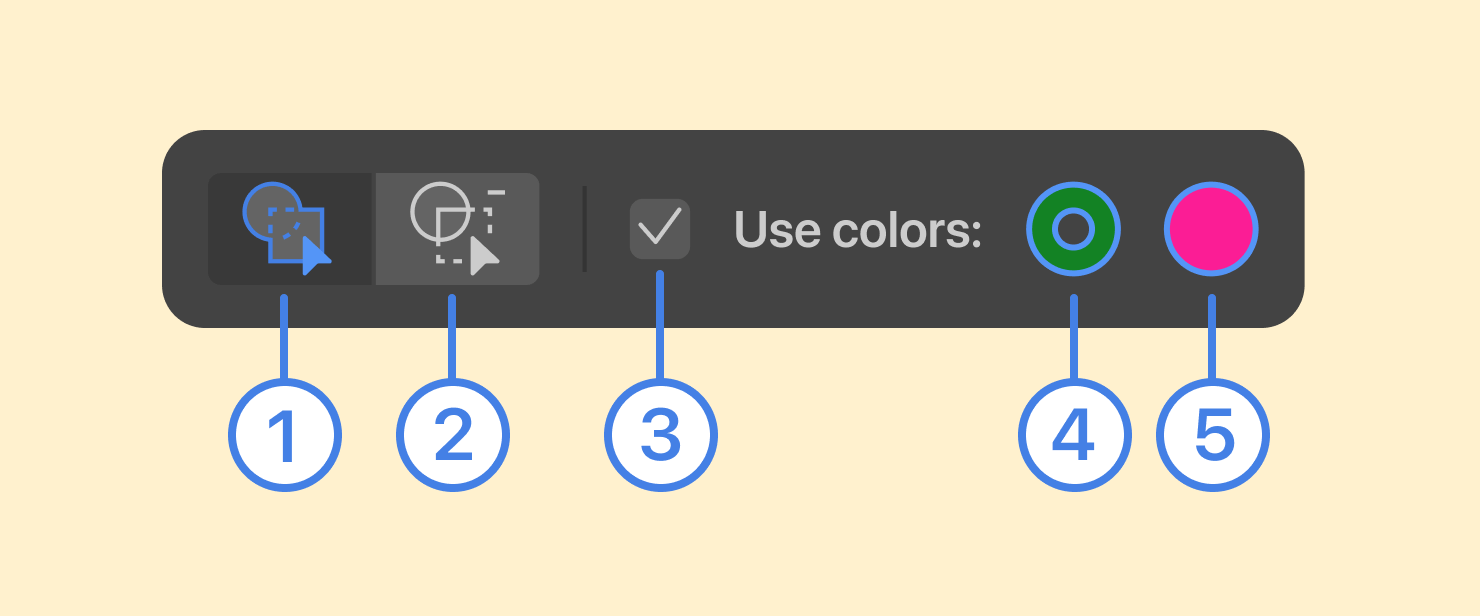
- Merge mode.
- Erase mode.
- Use the current object’s appearance, or set up a new Stroke and Fill.
- The colors of the new Stroke.
- The colors of the new Fill. Click to set up the color or other properties.
It’s easy to use this tool in Amadine. Simply select two or more objects. Then click on the Fusion tool icon in the Tools panel. While the tool is activated, use Cmd or Cmd + Shift to switch between the Fusion tool and the Move tool, which helps you select or delete more shapes. A helpful tip to know is that Cmd + Shift switches to either Move or Selection tool depending on which of them was active most recently.
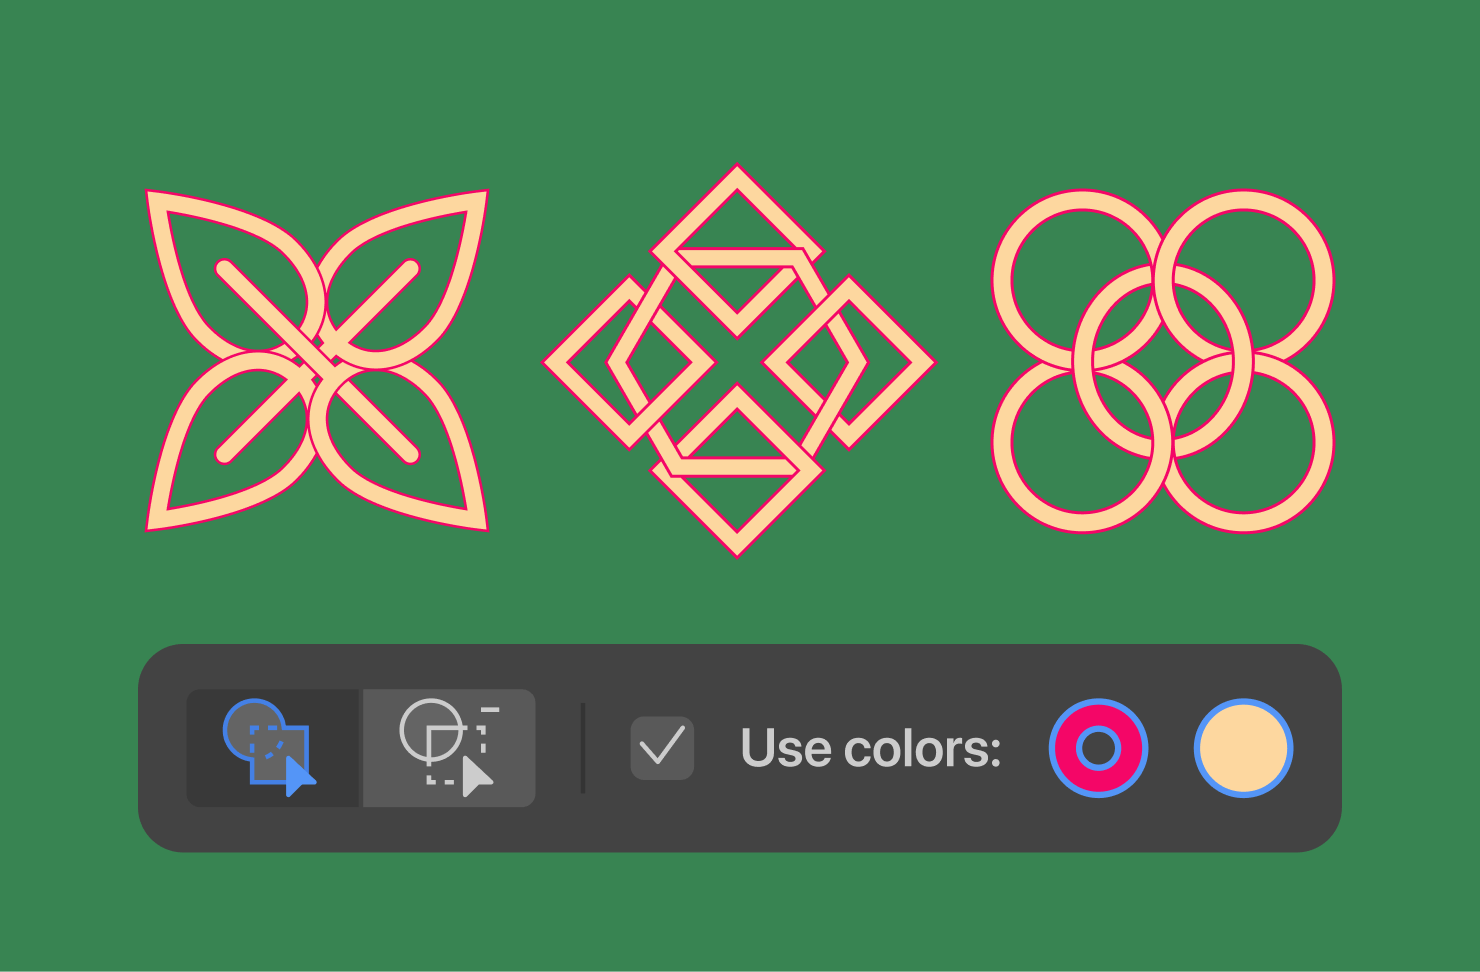
It’s also good to know that there are two simple modes in Amadine’s fusion tool: Merge mode and Erase mode. The merge mode is the default one, and it helps you combine shapes to make a bigger area from the smaller shapes that are touching. The combined shapes in the Merge mode are shown in green.
The Erase mode is activated by the erase button in the Control panel. Users can also hold down the Option key (or their finger down on screen for iPad) to activate the Erase mode. This mode uses red color to highlight object parts that will be removed. The cursor’s icon has a minus sign, so it is easy to intuitively understand. Delete segments by clicking on them while in the Erase mode.
The control panel also lets users determine the stroke and fill properties of the new shape, or retain the settings of the current object.

Fill and Stroke in One Click
The Amadine app has the ability to immediately add both Fill and Stroke color, similarly to the Live Paint Bucket tool in Illustrator. This means you don’t have to reapply fills after merging shapes, which streamlines creating as you go. This gives the creator more control, since users can change colors of the newly created shapes as they go.
Amadine offers a lifetime purchase for a Mac, iPad and iPhone, and a choice of affordable monthly and yearly subscriptions on iPad and iPhone to suit any budget. This makes it accessible for even entry-level designers or hobby artists who want to experiment with a powerful shape building tool in a vector design app, something that would have only been accessible to professional designers in the past.
Read more about the Fusion tool, and check out examples of the cool designs you can build with it in the dedicated article.
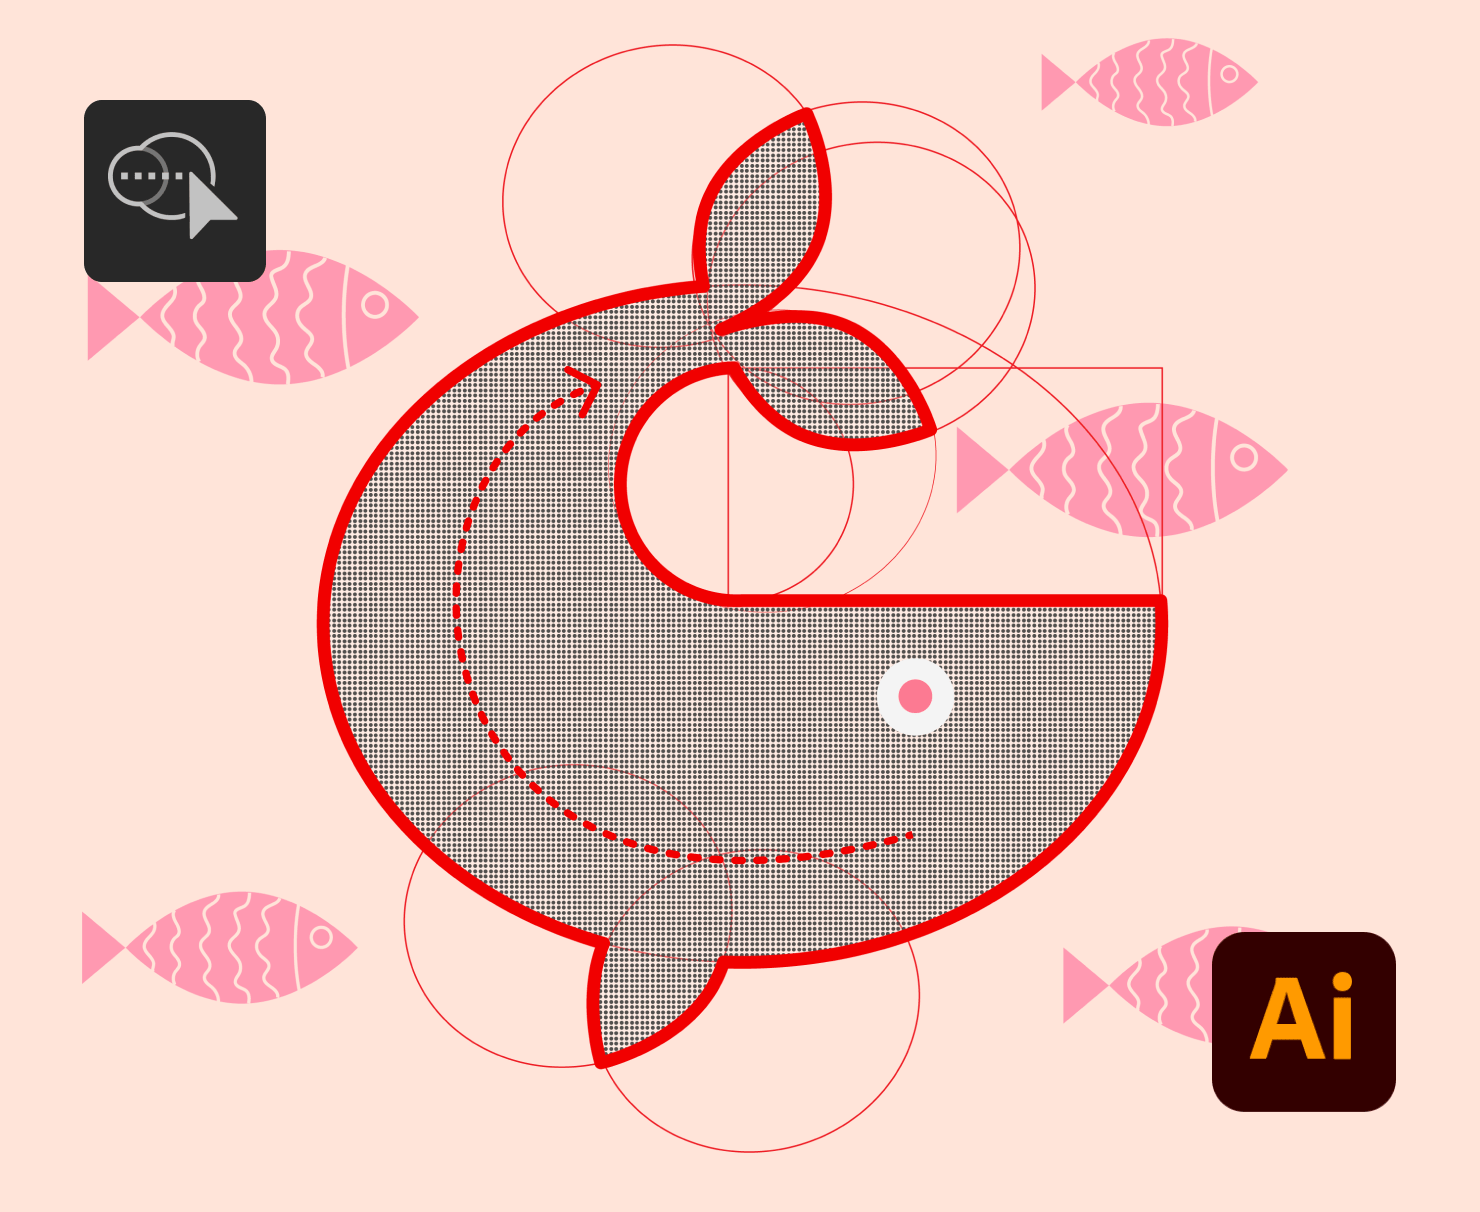
Adobe Illustrator’s Shape Builder Tool
The Adobe Illustrator’s Shape Builder tool is another popular tool in the well-known vector graphics app. This tool provides all the shape merging capabilities you would expect in a comprehensive design app.
In Illustrator, to use the Shape Builder tool, select the paths you want to merge by selecting the shapes using the Selection tool, or hold the Shift button to select multiple shapes. Then click the Shape Builder tool or use the shortcut Shift + M. Next, click and drag the mouse over the area where you want to combine two or more shapes. When you release the mouse, the shapes will be merged.
The art style from the area where the movement began is applied to the merged shapes. This can be overridden by selecting Color Swatches from the Pick Color From drop-down list in the Shape Builder Tool Options dialog. To extract an area from the rest of the shape, use the Erase mode of the Shape Builder tool. Press Alt (Windows) or Option (macOS), and select the closed region you want to delete. In erase mode, you can also delete edges. This is helpful if you want to clear the remaining portions after creating the shape you want.
In Adobe Illustrator, it is not possible to set the color and other stroke settings for shapes that the user will unite (like in Amadine and Affinity Designer) so that the newly created shape possesses these properties. You have to use the Live Paint Bucket tool for this. And, another difference of Adobe Illustrator is that it is a subscription-based tool, which is different from the other vector graphic design apps that offer an option of one-time purchase. Overall however, Adobe’s Shape Builder is a solid tool with excellent shape creating capabilities.
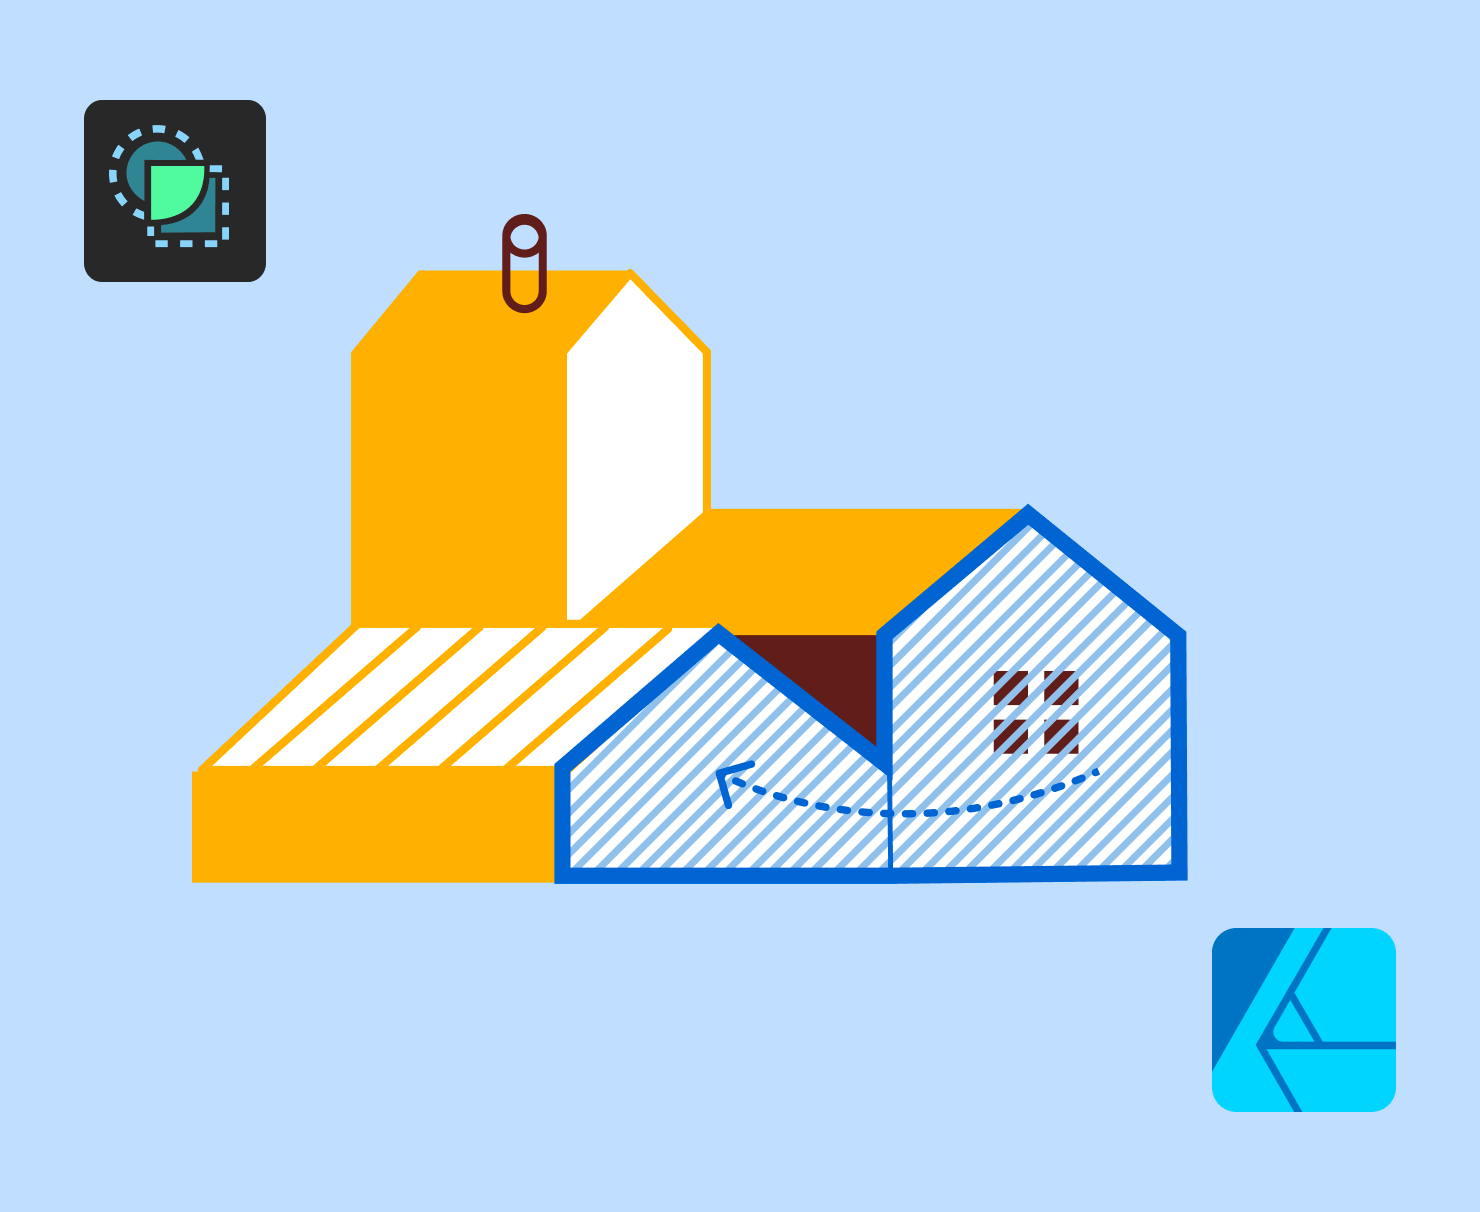
Affinity Designer’s Shape Builder Tool
The Affinity Designer app offers its own version of the Shape Builder Tool. Users start by selecting the objects to include in the new shape formation. These become the ‘candidate’ shape areas, then you enable the addition, deletion or creation modes of these areas as a final step.
The Action setting is adjusted in the context toolbar. This is where you select add, remove or create. In the create mode, the original objects are changed, and a new shape is created. In addition, there are two options—you can first highlight areas and then press the Plus or Minus keys and it will work. Or you can first click on Plus or Minus keys and then the tool will work like any other Shape Builder—instantly create/delete shapes. It’s highly convenient that there are two modes allowing both editing on the go, and editing by clicking, after selecting all the areas you want.
The other settings make it easy to customize a shape. In the Drag method setting, users can choose between drawing a freehand line, a straight line or using the selection marquee to select areas or select-and-add areas in one operation. The Clean up setting gives several options to automatically remove unwanted curves and shape areas when creating shapes. Lastly, the setting Use style from the first selected area setting allows styles (Fill/Stroke color, layer effects and stroke properties) to carry over to the new areas from the area when you begin dragging.
The Affinity Designer Shape Builder Tool offers users the full range of capabilities for creating and manipulating shapes. If you’re not familiar with vector design software, this tool might take more practice to learn to use effectively. But, users appreciate that Affinity Designer offers a one-time purchase (at least one for a major version upgrade) for a vector editing app, rather than a subscription only option, as Adobe Illustrator offers. Overall, Affinity Designer is a useful, budget-friendly app offering an easy Shape Builder tool for creating new shapes out of existing ones.
Linearity Curve’s Shape Builder
The Shape Builder tool in the Linearity Curve app is the fourth in our lineup. To create shapes in Linearity, activate the Shape Builder tool in the Toolbar and select at least two existing shapes. Then activate the Shape Builder tool, and click and draw across the shapes you want to merge. Release the click when all the shapes are included in the selection. Then the shapes are combined into a single shape.
Similar to Amadine’s Fusion tool, there are two modes in Linearity, Merge (default mode) or Erase mode. To switch between them, hold the Option key while drawing. Similar to the tools in the other apps, Merge mode connects intersecting areas, and Erase mode deletes intersecting parts. After you select a mode, simply click (or tap on an iPad) and drag along the intersecting areas of the chosen shapes to erase or connect the intersecting areas.
When the Merge mode is active, a thick blue outline marks the overlapping shape parts that are being merged. When Erase mode is active, a red line marks the shape portions that are being erased.
This app is also offered on subscription basis and user work is stored in a Linearity Curve account in the cloud. At a more budget friendly price than Adobe, it’s a great tool for artists and designers who want the capability of a vector Shape Builder tool that is easy to use.

Conclusion
Now that we’ve looked at Shape Builder tools across four vector design applications, Amadine, Adobe Illustrator, Affinity Designer, and Linearity Curve, it’s clear that they each have different advantages and limitations. Amadine’s Fusion tool stands out for the user-friendly interface and instantaneous possibility to color the newly created shape, allowing creators to manipulate shapes and experiment before finalizing changes. It’s also affordable, so even beginners can work with this tool without committing to an expensive subscription.
On the other hand, Adobe Illustrator’s tool, while a standard in the industry and quite comprehensive, requires switching to another tool to be able to set Stroke and Fill for the newly created shapes, potentially leading to a less smooth design process. It’s also the priciest tool among the four, possibly making it out of reach for beginners or those who want to play around with illustrations for fun.
Affinity Designer’s Shape Builder provides an easy process for merging shapes, but might require a learning curve for those new to vector design software. Linearity Curve’s Shape builder also offers an affordable subscription-based model, but does not provide a one-time purchase option, while storing all your works in their cloud.
To learn which Shape Builder tool you like, it’s helpful to try out the trial version of each, and see which one is more comfortable for you to use. Despite their differences, these shape building tools empower creators of all levels to perform incredible vector manipulations without dealing with complicated Boolean operations, as you would have been forced to do in the past. Now anyone can learn to create complex logos, construct and modify shapes, or create illustrations in a few clicks, thanks to a variety of Shape Builder tools in vector design apps.