Changing Object's Shape
Compound Path
You can combine objects using compound paths. After creating a compound path, the original objects become one object. A compound path can be created from two or more objects. Areas where objects overlap create holes if the objects are filled with a color, gradient or image. A new compound path takes on the style of the original object that was in front of all others.
To create a compound path, select two or more paths. Then tap on the Make Compound Path in the Path panel.
Paths that make up a compound path can be split apart. To do this, use the Release Compound Path button in the Path panel.
The Layers panel displays a compound path as a basic object like a single path. Unlike a compound group, you cannot access the original paths in the Layers panel. The Selection tool still lets you edit anchor points of the original paths.
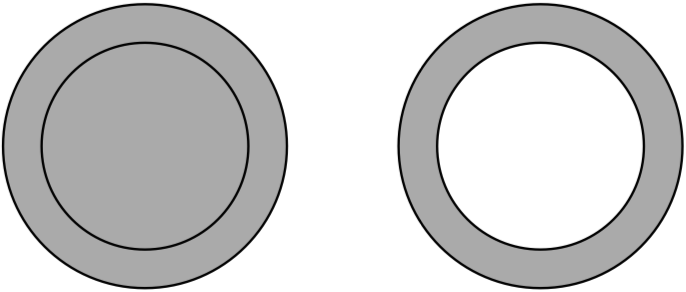
By using a compound path, you can cut holes in objects (prevent a particular area from being filled) or create a complex object out of several simple ones.
To cut a hole, you should place one object over another. Select them. Then tap on the Make Compound Path button. It doesn't matter if the smaller object is in front or behind the bigger one. The same result can be achieved by applying the Exclude Boolean operation, followed by Expand.
A path may outline some area in the middle of the object. The program uses certain rules to determine if such an area is inside a shape, and therefore should be filled, or it is outside and shouldn't be filled. These rules are Non-zero Winding Fill Rule ![]() and Even-Odd Fill Rule
and Even-Odd Fill Rule ![]() . To choose a rule, tap on one of the Fill Mode buttons in the Path panel. The Even-Odd rule is used by default because it creates more predictable results.
. To choose a rule, tap on one of the Fill Mode buttons in the Path panel. The Even-Odd rule is used by default because it creates more predictable results.
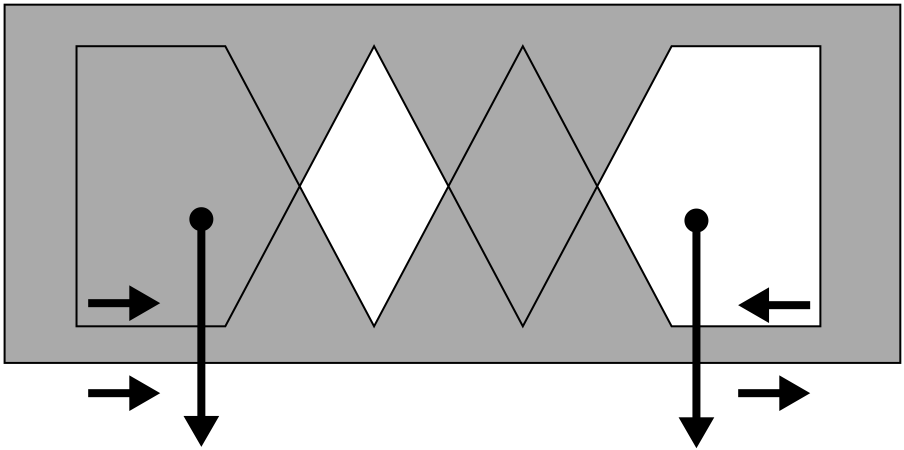
The following images demonstrate the difference between the two methods.
Let's see in detail how the rules work.
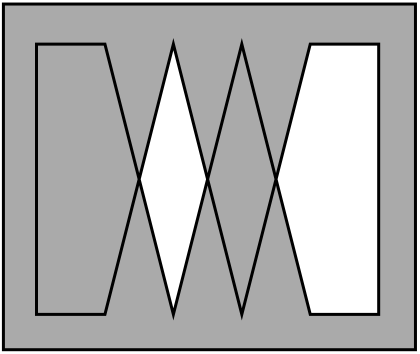
Non-Zero Rule
The non-zero rule determines whether a point is inside or outside the shape body by going from this point to the infinity in any direction. While going from the selected point toward infinity, we should count how many times we crossed paths. Each time we cross a path drawn clockwise, we should subtract 1. If we cross a path drawn counterclockwise, we add 1. The counted number is called a winding number.
The rule: if the winding number is zero, the point is outside the shape, so we don't fill it (cut a hole).
Notice that the direction of paths is a key thing in the non-zero rule.
Let's count the winding number (WN) for two cases. In the first, paths have the same direction. In the second example, directions will be opposite.
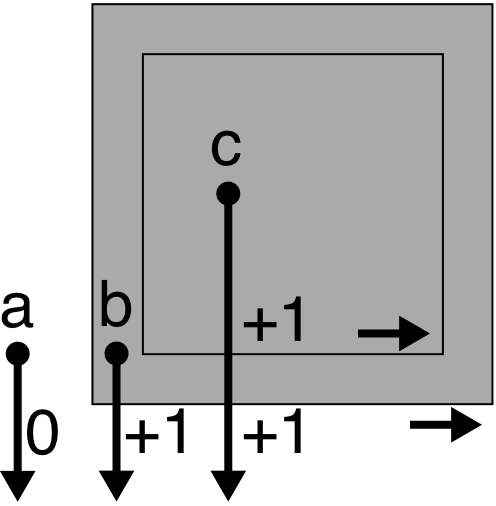
a: WN = 0. The a point is outside.
b: WN = +1. The b point is inside.
c: WN = +2. The c point is inside.

d: WN = 0. The d point is outside.
A more complex example where the internal path changed its direction.
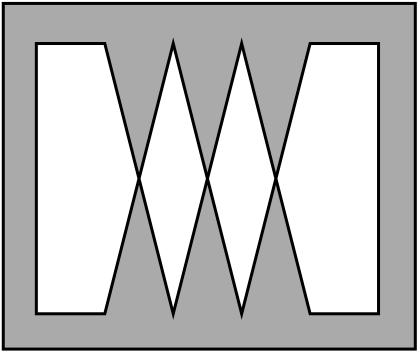
Even-Odd Rule
The even-odd rule is more straightforward. To determine if a point is inside or outside, we should go from this point toward infinity at any direction. We count how many paths we crossed.
The rule: if the number of crossings is even, the point is outside. If odd, the point is inside.
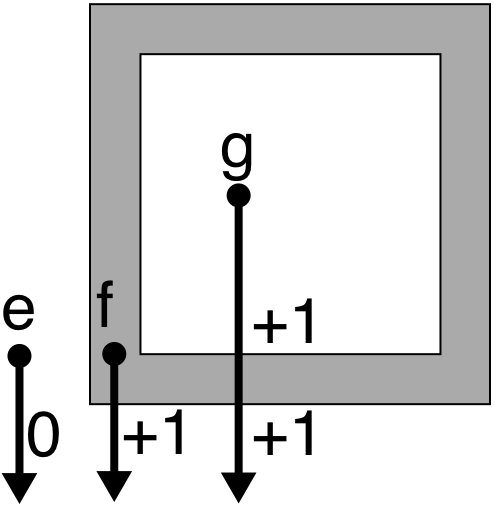
e: 0 crossings - even. The e point is outside.
f: 1 crossing - odd. The f point is inside.
g: 2 crossings - even. The g point is outside.