Selecting and Arranging Objects
Move, Resize and Rotate Objects
The geometric properties of an object can be modified directly on the canvas or using the Geometry panel. The latter has more options, and also lets you input numerical values, which provides better accuracy. Editing objects right on the canvas is usually faster and more convenient.
You should select an object before modifying its properties. A selected object displays its boundary box with handles in the corners at the middle of each side. We will use these handles later.
Most of the properties discussed below can be adjusted with an individual object, several objects or a group selected. Multiple selected objects, even not grouped, will respond to adjusting parameters in the same way as a group. For example, if you select two squares and change the width in the Geometry panel, the new value will be applied not to each of the squares but to the selection boundary. In order to apply the same value to all selected objects, use the Transform panel.
Manipulating an Object on the Canvas
Move an Object
To move an object, activate the Move tool ![]() . Then tap on the object and drag it.
. Then tap on the object and drag it.
As a rule, you should grab a visible part of an object. For example, when a rectangle has a stroke but there is no fill, you should drag the outline of the object.
Resize an Object
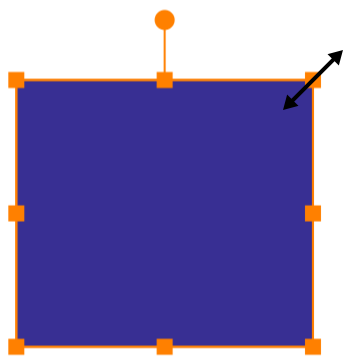
To resize an object, drag a corner or side handle on the object's boundary box using the Move tool ![]() . To preserve the aspect ratio, hold down a second finger on the screen while dragging a handle. Or activate the corresponding mode
. To preserve the aspect ratio, hold down a second finger on the screen while dragging a handle. Or activate the corresponding mode ![]() .
.

When you drag a corner or side handle the opposite corner or side of the object's boundary retains its position by default. To resize an object symmetrically, hold down two fingers on the screen while dragging a handle. Or activate the corresponding mode ![]() . In this case, the center of the boundary will preserve its location.
. In this case, the center of the boundary will preserve its location.
Rotate an Object
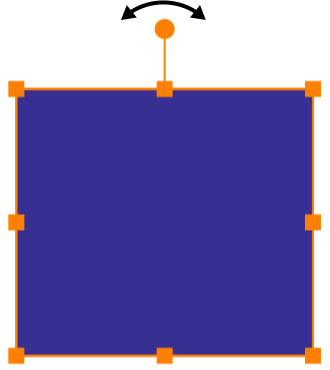
To rotate an object, activate the Move tool ![]() . Drag the round handle around the object's center.
. Drag the round handle around the object's center.

Holding down a second finger on the screen, you can rotate with 15 degrees steps. The same can be done by activating the corresponding mode in the Control panel.
The default center of rotation coincides with the center of the object's boundary. To set any other point as the center of rotation, tap on ![]() in the Control panel. Then drag a circular handle, that indicates the rotation center, to a new place.
in the Control panel. Then drag a circular handle, that indicates the rotation center, to a new place.
Controls of the Move Tool
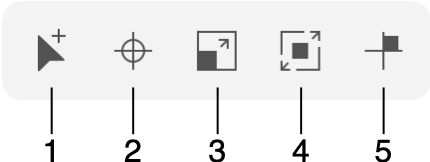
The Move tool can operate in different modes. They are available in the Control panel as soon as you activate the tool.

1 - Select multiple objects. Tap on objects that you want to select one after another. A tap on a selected object will deselect it. Also, a gesture is available.
2 - Select a new center of rotation for a selected object.
3 - Resize an object preserving its aspect ratio. Also, a gesture is available.
4 - Resize an object symmetrically in relation to its center. Also, a gesture is available.
5 - Constrain an object to move only vertically, horizontally or along a ±45 degree axis. If you rotate the object, its angle snaps to 15 degrees steps. Also, a gesture is available.
Using the Geometry Panel
The Geometry panel helps you manipulate objects by setting up exact values for the object's location, size or rotation angle. The Move control on the panel lets you move vertically or horizontally as you could do using the keyboard arrows.
Modifier Keys and Shortcut Summary
With an external keyboard, you can use the following shortcut and modifier keys.
Shortcut:
- V activates the Move tool.
Move tool modifier keys:
- Space switches to the Pan mode.
- Command switches to the Selection tool.
- Shift allows you to select multiple objects.
- Shift allows resizing an object preserving its aspect ratio.
- Shift lets you rotate an object in 15 degree steps.
- Option lets you duplicate an object. Option-drag an object to create its duplicate.
- Option lets you resize an object preserving the location of its center.
- Option-Shift resizes an object preserving its aspect ratio and location of the center.