Color, Gradient and Image Fill
The Recolor Panel
The Recolor panel is used to adjust object colors. To open the panel, select Modify > Recolor… in the main menu.
The panel is designed to change many different colors of one or multiple objects at once. This is useful when you need to try different color schemes. The panel is also capable of decreasing the variety of colors by using one color tone instead of several similar ones. The key part of the panel is the list of colors where you map the original colors into new ones.
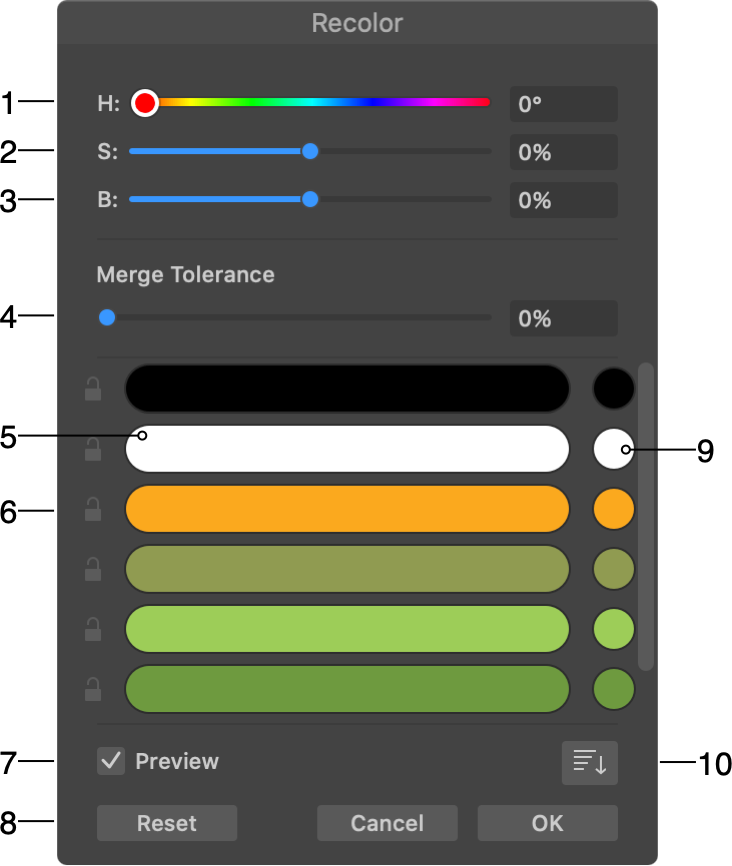
1 - Changes the Hue of all output colors.
2 - Changes the Saturation of all output colors.
3 - Changes the Brightness of all output colors.
4 - Merge Tolerance defines a threshold for merging close color tones into one color.
5 - Input color which is one of the object's original colors. Several original colors may appear in the same line if they were set to be replaced with one output color.
6 - The lock icon lets you prevent an original color from being changed by any tool in the panel.
7 - Shows how objects on the canvas would look if you apply new colors.
8 - Restore the original object colors.
9 - Output color that an object's element will receive if you apply changes.
10 - Changes the order of colors in the list (e.g., by lightness).
Clicking on the original colors in the list lets you select one or multiple lines in order to manipulate the colors directly. You need to press and hold the Shift key to select a range of colors. The Cmd key helps you select multiple colors in arbitrary order.
In order to find out the numeric value of an input color in the hexadecimal format, place the mouse cursor over that color.
The panel lists stroke and fill colors, as well as base colors of raster effects. If an object has a gradient with several base colors, all of them will appear in the list.
The panel cannot recolor an image used to fill a shape.
The list of colors has a context menu:
- Merge merges selected input colors.
- Split splits input colors that are displayed in the same line. This command does the opposite to Merge.
- Lock lets you keep the output color unchanged. This command repeats the function of the lock icon.
- Unlock deactivates the lock option.
- Restore makes the output color identical to the corresponding input color. This command also splits input colors if they were merged.
Change the Hue, Saturation and Brightness
The Hue, Saturation and Brightness sliders affect all of the output colors. If you don't want a certain output color to be modified, lock it using the lock icon.
Set an Output Color Directly
You can set an output color directly. To do this, click on the circle with the output color. This opens the Color panel.
In order to make the output color the same as the corresponding input color, choose the Restore command from its context menu.
Merging Colors
Merging colors lets you represent input colors with a smaller number of output colors. This can be done by replacing multiple similar input colors with the same output color. This is an equivalent for the posterize function from raster graphics editors.
You can merge colors automatically or manually. Also you can combine these two methods.
Once two or more colors have been merged, they appear in the same line, and consequently have the same output color. The new output color is the same as one of the output colors before merging.
The following image shows two green colors merged. The output color was taken from the second green color.
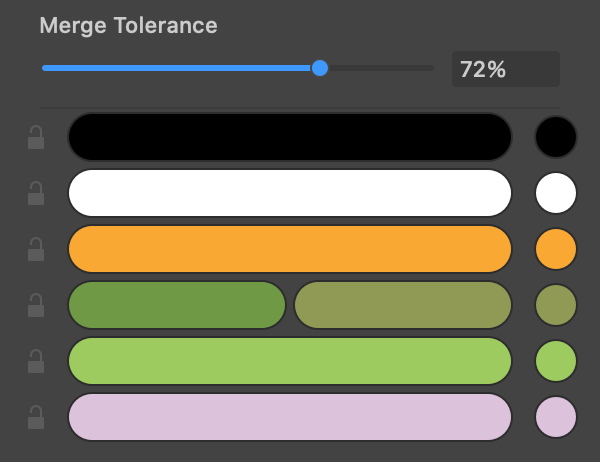
Merging Colors Automatically
To merge colors automatically, just move the Merge Tolerance slider to the right. The Merge Tolerance set to 0% turns the automatic merging off. By increasing the tolerance, you allow more different color tones to get into the same group.
To prevent a particular color from being merged, lock it.
Merging Colors Manually
In order to merge input colors manually, drag one of them on top of another. The output color will be taken from the input color onto which you drop other colors. In other words, if you drag a red color onto a blue one, the output color of this group will be the same as the blue color before merging.
Another way to merge colors is to select multiple of them in the list. Then choose the Merge command from the context menu.
In order to separate merged colors, select Split in the context menu. Or just drag one of the merged colors to a new line.