Workspace and Program Interface
The Control Panel
The Control panel, located right below the main menu, displays the settings of the currently activated tool (if it has those). The settings are described together with tools in the dedicated sections.

The middle of the panel lets you manipulate selected objects (e.g., align or adjust spaces). The right side of the panel is occupied by controls that set up the current document and bring up the libraries.
The rightmost group of controls lets you zoom in or out. You can type in the required scale, select it from a drop-down menu or simply click the minus or plus buttons.
The button with an eye icon opens the drop-down menu, which helps you set up the work area and current document.
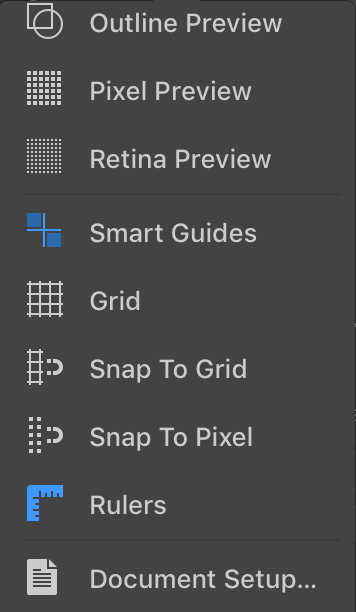
Outline Preview: Toggles the way objects are displayed on the canvas. You can either show objects normally or as a wireframe (with no stroke, fill, etc.). For more details, read the Preview Modes section.
Pixel Preview: Displays the artwork as raster graphics.
Retina Preview: Displays the artwork as raster graphics simulating Retina screen resolution.
Smart Guides: Shows smart guides when you move or resize objects.
Grid: Turns the grid on and off.
Snap to Grid: Allows the program to snap objects to the grid when you move them.
Snap to Pixel: Snap objects to the pixel grid. This makes sense when you need to save your vector graphics in a raster file format. For more details, read Align Objects to the Pixel Grid.
Rulers: Shows or hides the rulers.
Document Setup: Opens the Document Setup dialog.