Workspace and Program Interface
The Main Window
The main window is where you preview and edit documents. We can also call it "document window" in this documentation.
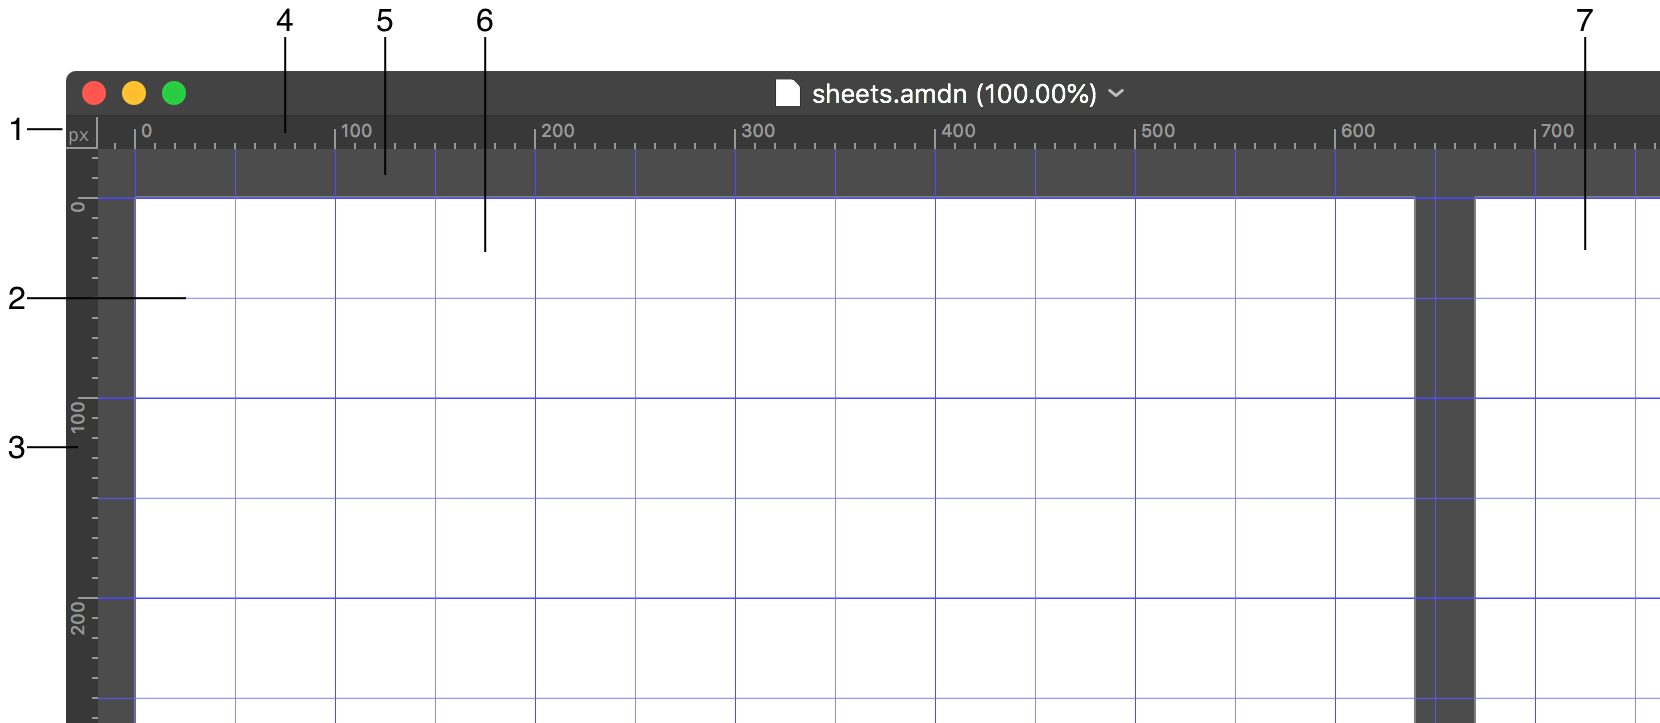
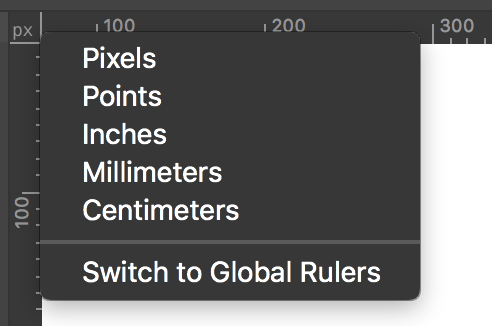
1 - Measurement units. To change the measurement unit, click on the current one and choose a new option from the list. The rulers should be displayed to have this button on the screen.
The last item in the drop-down list lets you choose between Global Rulers and Active Sheet Rulers. The Active Sheet Rulers option sets the zero point of the rulers to the top left corner of the active sheet. As soon as you activate another sheet, the corner of this sheet will define the new location of the zero. If you select Global Rulers, the zero point of the rulers will be static.
2 - Grid. To show or hide the grid, use the View > Grid menu command. For more details, read the Grid and Guide Lines sections.
3 and 4 - Vertical and horizontal rulers.
5 - Canvas
6 and 7 - Sheets
Rulers
The vertical and horizontal rulers are displayed by default when you create a new document. To hide or show the rulers, use the View > Rulers menu command.
The measurement units button at the top left corner of the main window appears and disappears together with the rulers. To select a measurement unit, click on the button and choose a new measurement unit.
Canvas and Sheets
The canvas is the space where you can place and edit elements of your design.
Although objects can be placed anywhere on the canvas, your design should fit a sheet. You can think about sheets as an equivalent to pages in a text editor. A sheet represents a printable area. Objects placed outside any sheet will not be printed or exported. If a part of an object is located on a sheet, and the rest is on the canvas, the boundary of the sheet will work as the crop area.
There can be one or multiple sheets on the canvas and, consequently, in your project. This lets you save several related or completely separate designs as a single document.
How to manage sheets and arrange them over the canvas is described in the Sheets section.
Zooming In and Out
There are several ways to change the scale of the open document:
- Commands at the top of the View menu let you zoom in or out through the predefined steps or fit the current sheet or all of them to the main window.
- The Zoom tool in the Tools panel lets you fit a portion of your design to the main window. Activate the tool. Then click and drag the mouse cursor to indicate the area you want to enlarge. In order to zoom out, click on the canvas with the Zoom tool holding down the Option key. The point at which you click will be centered in the main window.
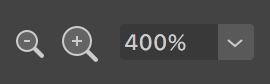
- Zoom controls in the Control panel let you zoom in or out in steps, select one of predefined options in the drop-down list, or type in a value you want into the edit box.
- Use the mouse scroll wheel together with the Option key.
Position the Artwork within the View Area
At high levels of zoom, your design may not fit the view area completely. In such cases, you can use the horizontal and vertical scroll bars to access any part of the artwork.
Another way to do that is to use the Hand tool. It is more precise than the scroll bars. It also lets you move the artwork vertically and horizontally at the same time. Before using this tool, make sure that you are not in the text editing mode or changing the value of any edit box.
To move the artwork with the Hand tool, press and hold the Space key. The mouse pointer will turn into a hand icon. Drag the artwork. To deactivate the tool, release the Space key. The Hand tool can also be activated using the middle key of the mouse.
Preview Modes
The canvas can display your document in one of the following preview modes: normal, Outline, Pixel Preview or Retina Pixel Preview.
To switch between the modes, use the View menu. In fact, there are three options in the menu. When all of them are off, the program works in the normal mode, which is the default.
Normal Mode
The normal mode is supposed to be used as the main mode for editing vector paths, arranging objects, etc. In this mode, the program displays all object features such as the stroke, fill and effects.

Outline Mode
The Outline mode displays object outlines as paths. No Stroke, Brush, Fill or other features are visible. This mode might be useful when you need to edit paths. Since graphics are displayed in a very simplified way in the Outline mode, the program should redraw your design faster than in the normal mode.
Pixel Preview Mode
The Pixel Preview mode lets you see how your artwork may look after being rasterized (e.g., if you export it to a JPEG file). In this mode, the program simulates rasterization. All vector-based graphic elements in your document remain editable.
The program generates the pixel grid based on the size of the current sheet. For example, if the sheet is 100x100px, your artwork will be presented by 100 pixels horizontally and 100 pixels vertically.
To hide or show the pixel grid, use the Guides and Grid section of the Preferences dialog.
Retina Pixel Preview Mode
The Retina Pixel Preview mode is identical to the Pixel Preview mode, but it will display the artwork with doubled resolution. In other words, if the sheet is 100x100px, your artwork will be presented by 200 pixels horizontally and 200 pixels vertically.