How to Use Gradients in Amadine
Gradient, by nature, is a slow, gradual transition (thus, we call the effect gradient) from one color to another. Gradients are used in places where you want a more natural change in color rather than using one solid color fill throughout the shape. The best way to breathe life into your flat illustration is to add some gradients to create a visual illusion of volume. In a real-world environment, the human eye rarely encounters flat colors, as natural/artificial light falls onto surfaces in different directions depending on the angle. Gradients add originality, brightness, character and realism to the shapes in the illustration and always light up the picture.
Amadine allows its users to handle gradients in two ways:
- You can fill an object using the Gradient tool by adding and adjusting the gradient directly on the canvas.
- Use the Color panel for the same purpose.
Neither of these methods is mutually exclusive. You can use one or both of them for different parts of your artwork. Let’s learn step-by-step how to add both of the gradient types in Amadine to bring out the best in your artwork.
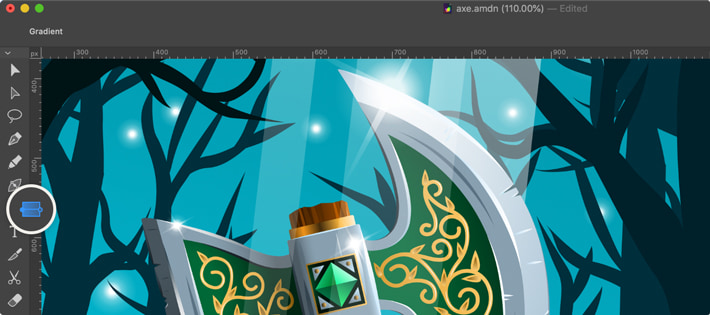
How to Add Gradients Using the Gradient Tool
Gradients are added and adjusted directly to any object on the canvas. The Gradient tool in the Amadine app has been highly praised by professional graphic designers for its ease of use and versatility.
Adding Gradients With the Help of the Gradient Tool
You can fill an object with a linear gradient following the steps below:
- Select the object you intend to add the gradient to.
- Activate the Gradient tool on the Tools panel by clicking on it.
- To add a start point for your gradient, place the cursor over the object, press the left mouse button and drag.
- Move the cursor around to adjust the direction of the gradient and control the way it fills the object.
- Click on it at the end point.
Adjusting Gradient Colors Using the Gradient Tool
Let’s find out how a gradient is created. For the sake of simplicity, we’ll discuss linear gradients at this point. You need to activate the Gradient tool so that you are able to edit a gradient on the canvas.
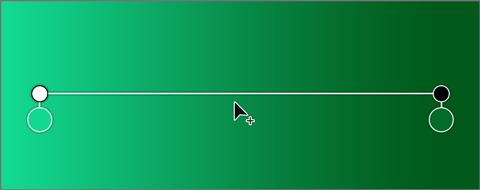
Any given gradient has two strictly designed colors at its end points. Let’s agree to call them “base colors.” Later on, we’ll also discuss how to add more than two colors to meet your artistic needs.

All colors in the middle between the base colors are generated by the software to create a smooth transition between them. The color change direction is demonstrated along the line that links the base colors. At the ends of the line, you can see the white and black handles. To add an intermediate base color, click on the line. The cursor will add to a plus sign to demonstrate that the operation is possible.
You will see a new circle attached to the line, which depicts the third base color.
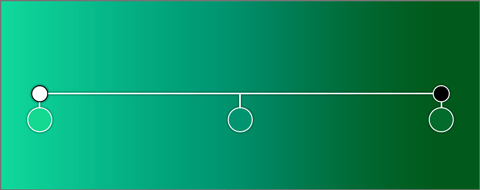
The mouse is used to move base colors in order to change the distribution of colors throughout the given area. If you wish to remove an intermediate color, simply drag it off the line until an x appears near the cursor. Then you can release the mouse button.
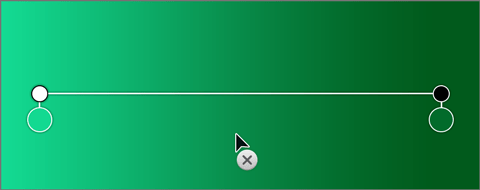
Please note that you can only remove colors until there are two colors left in the gradient. You cannot delete the last two, as the gradient itself needs two shades to create the color transition.
If you wish to change a base color, you need to click on the corresponding circle. Then a simplified version of the Color panel will open where you can change the color.
Adjusting the Gradient Position Using the Gradient Tool
The distance between the base colors can be changed by using the black and white handles at the ends of the gradient.
The white handle should be dragged to move the gradient in relation to the object.
You can rotate the gradient by dragging the black handle around the white one.
To change the width of the color transition area, you need to move the black handle to or away from the white handle.
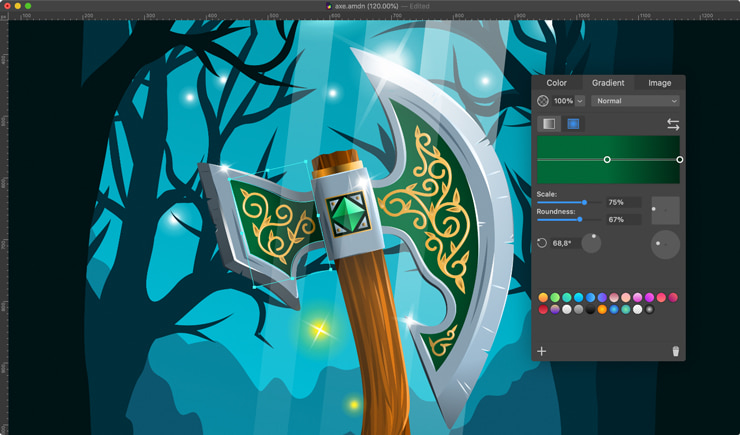
How to Add Gradients Using the Color Panel
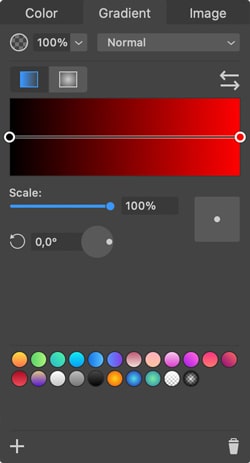
The color panel allows you to add gradients specifically and precisely.
When you open the Gradient tab of the Color panel, you automatically apply a default gradient to the selected object.
Adjusting Gradient Colors With the Color Panel
The base colors are added and deleted in the same way as on the canvas. Please refer to the Adjusting Gradient Colors Using the Gradient Tool subsection above for details.
Click on the corresponding circle in order to change a base color.
Different color tints could take up more or less space. For that effect, you need to drag circles that define the location of base colors.
You can set all colors at once by clicking on a predefined or custom swatch.
Adjusting the Gradient Position Using the Color Panel
The distance between the base colors at the ends can be changed with the help of the Scale parameter. The result is equivalent to moving the black handle on the canvas closer or farther from the white one. The direction of the gradient can be changed by using the rotation control.
The square control is used to move the whole gradient related to the object. You need to take into consideration the fact that it is more convenient to move and rotate gradients directly on the canvas.