How to Work With Text—Part 3 (Geometric Properties)
First things first, let’s point out several basic notions:
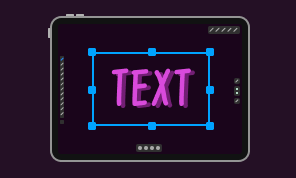
- Text box is relocated and resized with the help of the Move tool.
- You can set the size, location or angle of the text frame by entering numeric values in the Geometry panel
- The Horizontal and Vertical Flip buttons work with text as well, but you aren’t likely to use them often.
- The Shear tools can turn a rectangular text frame into a trapezium.
Since the shape or path that contains text retains some of their properties as vector objects, you can modify them with vector editing tools. For example, a text on path reveals its anchor points when you activate the Selection tool. You can move, add or delete its points, or change the curvature of the path as if it was an ordinary path. The same tools work with the frame of a text box. You can easily add a new point with the Pen tool and then move it with the Selection tool to have five corners instead of four.
Did you know you can turn text into a pure vector object in the Amadine app for iPads and iPhones? You can do this by tapping on the Expand button in the Path panel. You will see a group of letter-like objects in the Layer panel. They retain their visual side, but in their essence they are not letters anymore, but regular paths. You can use the Pen, Selection and other tools, apply the Boolean operations, Clipping Mask and so on. Modifying individual letters makes sense, for example, if you are making a logo and want to add some features to standard letters.
The series of how to work with text tutorials has come to an end, but we’ll see you soon in the new tutorials.